VMwareがBroadcomに買収されたことで、無償版ESXi Hypervisorの提供が終了してしまった。
自宅の検証環境で使うために重宝していたのだが、最新版が入手できなくなった以上乗り換え先を検討しなければならない。
一番シンプルなのはKVMをCockpitで操作するというやり方だと思うのだが、どうもRHEL系は仮想マシンのスナップショットを簡単にとることができないらしいことが判明。
8.19. 仮想化 | Red Hat Product Documentation
仮想マシンスナップショットのサポートが限定されました
仮想マシンのスナップショットの作成は、現在、UEFI ファームウェアを使用していない仮想マシンのみでサポートされています。さらに、スナップショット操作中に QEMU モニターがブロックされる可能性があり、これは特定のワークロードのハイパーバイザーのパフォーマンスに悪影響を及ぼします。
また、現在の仮想マシンスナップショットの作成メカニズムは非推奨となり、Red Hat は実稼働環境での仮想マシンスナップショットの使用を推奨していないことにも注意してください。
手軽に変更をもとに戻せるスナップショット機能は検証用途では必須なので使えないのは致命的。
2025/05/23 追記:
その後、Oracle Linux 9.5 ではスナップショットが取れるようになっていることが判明。カジュアルな用途であればCockpitも十分実用的になった。
同じくKVMの仮想環境を管理するための仕組みとしてオープンソースなoVirtというプロジェクトがあり、その実装の一つにOracle Linux Virtualization Manager(OLVM)があるのだが、どうやらこちらではスナップショットが取れる様子。ちょっと構築してどんなものか見てみることにした。
マニュアルは以下を参照。
Oracle Linux Virtualization Managerスタート・ガイド
ざっくり言うと、Oracle Linux Virtualization ManagerはKVMホストを管理するため仕組みで、エンジンホストと呼ばれる専用のホストにoVirtエンジンをインストールすることで構成される。したがって、登場人物としてはエンジンホストと実際に仮想マシンを動かすKVMホストの最低2つ。それぞれに設定を行うことになる。
エンジンホストに関しては自己ホストエンジンとすることでKVMホスト内にエンジンホストを構成することもできるようだ。ただ、その場合KVMホストが2台以上必要とされているので、結局のところ2台以上ホストが必要。
今回は、エンジンホストを独立したホストとして構成する。2024/09/26 時点では 4.5 Release が最新版。
KVMホスト上に適当な仮想マシンをインストールところまで実施する手順を簡単に確認してみる。
エンジンホストの構成
まずはOracle Linux 8.8以上をインストール。インストールオプションは最小で、余計なものは入れずあとから追加するスタイル。ハードウェア的な最低要件は、2コアCPU、メモリ4GB、ディスク25GB。
OSのインストールが完了したら、dnfで必要なパッケージを導入していく。マニュアル的には追加のカーネルモジュールのインストールの後に一度再起動が必要。
# dnf config-manager --enable ol8_baseos_latest
# dnf install oracle-ovirt-release-45-el8
# dnf clean all
# dnf install kernel-uek-modules-extra

# systemctl reboot

# dnf install ovirt-engine
ovirt-engine のインストールが終わったら、エンジンを構成する。選択肢のあるものは基本的にデフォルト設定で問題ない。
# engine-setup# engine-setup
[ INFO ] Stage: Initializing
[ INFO ] Stage: Environment setup
Configuration files: /etc/ovirt-engine-setup.conf.d/10-packaging-jboss.conf,
/etc/ovirt-engine-setup.conf.d/10-packaging.conf
Log file: /var/log/ovirt-engine/setup/ovirt-engine-setup-20240926114812-wm12sy.log
Version: otopi-1.10.4 (otopi-1.10.4-1.el8)
[ INFO ] Stage: Environment packages setup
[ INFO ] Stage: Programs detection
[ INFO ] Stage: Environment setup (late)
[ INFO ] Stage: Environment customization
--== PRODUCT OPTIONS ==--
Configure Cinderlib integration (Currently in tech preview) (Yes, No) [No]:
Configure Engine on this host (Yes, No) [Yes]:
Configuring ovirt-provider-ovn also sets the Default cluster's default network provider to ovirt-provider-ovn.
Non-Default clusters may be configured with an OVN after installation.
Configure ovirt-provider-ovn (Yes, No) [Yes]:
Configure WebSocket Proxy on this host (Yes, No) [Yes]:
* Please note * : Data Warehouse is required for the engine.
If you choose to not configure it on this host, you have to configure
it on a remote host, and then configure the engine on this host so
that it can access the database of the remote Data Warehouse host.
Configure Data Warehouse on this host (Yes, No) [Yes]:
* Please note * : Keycloak is now deprecating AAA/JDBC authentication module.
It is highly recommended to install Keycloak based authentication.
Configure Keycloak on this host (Yes, No) [Yes]:
Configure VM Console Proxy on this host (Yes, No) [Yes]:
Configure Grafana on this host (Yes, No) [Yes]:
--== PACKAGES ==--
[ INFO ] Checking for product updates...
[ INFO ] DNF パッケージ grafana-postgres は利用可能ですが、インストールされていません。
[ INFO ] No product updates found
--== NETWORK CONFIGURATION ==--
Host fully qualified DNS name of this server [olvmtest.dn.home]:
Setup can automatically configure the firewall on this system.
Note: automatic configuration of the firewall may overwrite current settings.
Do you want Setup to configure the firewall? (Yes, No) [Yes]:
[ INFO ] firewalld will be configured as firewall manager.
--== DATABASE CONFIGURATION ==--
Where is the DWH database located? (Local, Remote) [Local]:
Setup can configure the local postgresql server automatically for the DWH to run. This may conflict with existing
applications.
Would you like Setup to automatically configure postgresql and create DWH database, or prefer to perform that manually?
(Automatic, Manual) [Automatic]:
Where is the Keycloak database located? (Local, Remote) [Local]:
Setup can configure the local postgresql server automatically for the Keycloak to run. This may conflict with existing
applications.
Would you like Setup to automatically configure postgresql and create Keycloak database, or prefer to perform that manually?
(Automatic, Manual) [Automatic]:
Where is the Engine database located? (Local, Remote) [Local]:
Setup can configure the local postgresql server automatically for the engine to run. This may conflict with existing
applications.
Would you like Setup to automatically configure postgresql and create Engine database, or prefer to perform that manually?
(Automatic, Manual) [Automatic]:
--== OVIRT ENGINE CONFIGURATION ==--
Engine admin password:
Confirm engine admin password:
Application mode (Virt, Gluster, Both) [Both]:
Use Engine admin password as initial keycloak admin password (Yes, No) [Yes]:
--== STORAGE CONFIGURATION ==--
Default SAN wipe after delete (Yes, No) [No]:
--== PKI CONFIGURATION ==--
Organization name for certificate [dn.home]:
--== APACHE CONFIGURATION ==--
Setup can configure the default page of the web server to present the application home page. This may conflict with existing
applications.
Do you wish to set the application as the default page of the web server? (Yes, No) [Yes]:
Setup can configure apache to use SSL using a certificate issued from the internal CA.
Do you wish Setup to configure that, or prefer to perform that manually? (Automatic, Manual) [Automatic]:
--== SYSTEM CONFIGURATION ==--
--== MISC CONFIGURATION ==--
Please choose Data Warehouse sampling scale:
(1) Basic
(2) Full
(1, 2)[1]:
Use Engine admin password as initial Grafana admin password (Yes, No) [Yes]:
--== END OF CONFIGURATION ==--
[ INFO ] Stage: Setup validation
[WARNING] Warning: Not enough memory is available on the host. Minimum requirement is 4096MB, and 16384MB is recommended.
Do you want Setup to continue, with amount of memory less than recommended? (Yes, No) [No]:Yes
--== CONFIGURATION PREVIEW ==--
Application mode : both
Default SAN wipe after delete : False
Host FQDN : olvmtest.dn.home
Firewall manager : firewalld
Update Firewall : True
Set up Cinderlib integration : False
Configure local Engine database : True
Set application as default page : True
Configure Apache SSL : True
Keycloak installation : True
Engine database host : localhost
Engine database port : 5432
Engine database secured connection : False
Engine database host name validation : False
Engine database name : engine
Engine database user name : engine
Engine installation : True
PKI organization : dn.home
Set up ovirt-provider-ovn : True
DWH installation : True
DWH database host : localhost
DWH database port : 5432
DWH database secured connection : False
DWH database host name validation : False
DWH database name : ovirt_engine_history
Configure local DWH database : True
Grafana integration : True
Grafana database user name : ovirt_engine_history_grafana
Keycloak database host : localhost
Keycloak database port : 5432
Keycloak database secured connection : False
Keycloak database host name validation : False
Keycloak database name : ovirt_engine_keycloak
Keycloak database user name : ovirt_engine_keycloak
Configure local Keycloak database : True
Configure VMConsole Proxy : True
Configure WebSocket Proxy : True
Please confirm installation settings (OK, Cancel) [OK]:
[ INFO ] Stage: Transaction setup
[ INFO ] Stopping engine service
[ INFO ] Stopping ovirt-fence-kdump-listener service
[ INFO ] Stopping dwh service
[ INFO ] Stopping vmconsole-proxy service
[ INFO ] Stopping websocket-proxy service
[ INFO ] Stage: Misc configuration (early)
[ INFO ] Stage: Package installation
[ INFO ] Stage: Misc configuration
[ INFO ] Upgrading CA
[ INFO ] Initializing PostgreSQL
[ INFO ] Creating PostgreSQL 'engine' database
[ INFO ] Configuring PostgreSQL
[ INFO ] Creating PostgreSQL 'ovirt_engine_history' database
[ INFO ] Configuring PostgreSQL
[ INFO ] Creating PostgreSQL 'ovirt_engine_keycloak' database
[ INFO ] Configuring PostgreSQL
[ INFO ] Creating CA: /etc/pki/ovirt-engine/ca.pem
[ INFO ] Creating CA: /etc/pki/ovirt-engine/qemu-ca.pem
[ INFO ] Creating a user for Grafana
[ INFO ] Allowing ovirt_engine_history_grafana to read data on ovirt_engine_history
[ INFO ] Setting up ovirt-vmconsole proxy helper PKI artifacts
[ INFO ] Setting up ovirt-vmconsole SSH PKI artifacts
[ INFO ] Configuring WebSocket Proxy
[ INFO ] Creating/refreshing Engine database schema
[ INFO ] Creating/refreshing DWH database schema
[ INFO ] Updating OVN SSL configuration
[ INFO ] Updating OVN timeout configuration
[ INFO ] Creating/refreshing Engine 'internal' domain database schema
[ INFO ] Creating default mac pool range
[ INFO ] Adding default OVN provider to database
[ INFO ] Adding OVN provider secret to database
[ INFO ] Setting a password for internal user admin
[ INFO ] Creating initial Keycloak admin user
[ INFO ] Generating post install configuration file '/etc/ovirt-engine-setup.conf.d/20-setup-ovirt-post.conf'
[ INFO ] Stage: Transaction commit
[ INFO ] Stage: Closing up
--== SUMMARY ==--
[ INFO ] No need to restart fapolicyd because it is not running.
[ INFO ] Starting dwh service
[ INFO ] Starting Grafana service
[ INFO ] Restarting ovirt-vmconsole proxy service
To login to oVirt using Keycloak SSO, enter 'admin@ovirt' as username and the password provided during Setup
To login to Keycloak Administration Console enter 'admin' as username and the password provided during Setup
Web access for Keycloak Administration Console is enabled at:
https://olvmtest.dn.home/ovirt-engine-auth/admin
Web access is enabled at:
http://olvmtest.dn.home:80/ovirt-engine
https://olvmtest.dn.home:443/ovirt-engine
Internal CA fingerprint: SHA256:
62:02:2C:0F:17:5A:47:F8:94:81:B1:91:97:1E:2F:A0:B8:D4:41:F5:D8:74:79:65:5C:6C:B2:06:ED:27:BC:B7
SSH fingerprint: SHA256:aQ5rJGMG5MosVBladx2td5aWCOOdNfxa7SAAlgg2DoQ
[ INFO ] Starting engine service
[WARNING] Warning: Not enough memory is available on the host. Minimum requirement is 4096MB, and 16384MB is recommended.
Web access for grafana is enabled at:
https://olvmtest.dn.home/ovirt-engine-grafana/
Please run the following command on the engine machine olvmtest.dn.home, for SSO to work:
systemctl restart ovirt-engine
--== END OF SUMMARY ==--
[ INFO ] Restarting httpd
[ INFO ] Start with setting up Keycloak for Ovirt Engine
[ INFO ] Done with setting up Keycloak for Ovirt Engine
[ INFO ] Stage: Clean up
Log file is located at /var/log/ovirt-engine/setup/ovirt-engine-setup-20240926114812-wm12sy.log
[ INFO ] Generating answer file '/var/lib/ovirt-engine/setup/answers/20240926115334-setup.conf'
[ INFO ] Stage: Pre-termination
[ INFO ] Stage: Termination
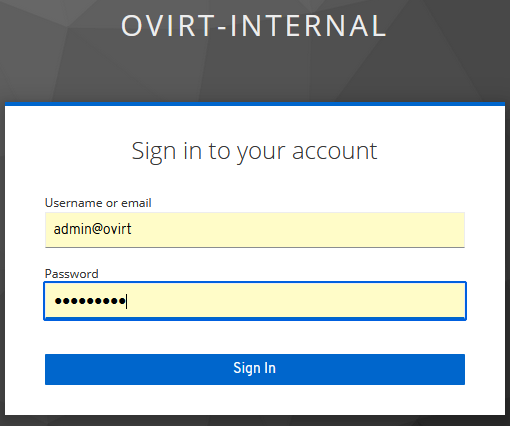
[ INFO ] Execution of setup completed successfully完了したら、管理ポータルにログインできるか確認しておく。
https://エンジンホスト名/ovirt-engine
ここで入れるユーザ名は admin@ovirt で、engine-setup で設定したパスワードでログインする。
KVMホストの構成
こちらも、Oracle Linux 8.8 以上をインストール。インストールオプションはこちらも最小で。ハードウェア的には実際に仮想マシンを動かすホストになるのでメモリやCPU、ストレージはそれなりなものを準備しておくこと。
OSのインストールが完了したら、こちらもdnfで必要なパッケージを導入、再起動する。
# dnf config-manager --enable ol8_baseos_latest
# dnf install oracle-ovirt-release-45-el8
# dnf clean all
# dnf install kernel-uek-modules-extra

# systemctl reboot
管理ポータルからKVMホストの追加
KVMホストの構成が終わったら、管理ポータルからKVMホストを追加する。
「コンピュート」 → 「ホスト」 を開き、「新規作成」ボタンを押下。KVMホストの情報を入力して「OK」。
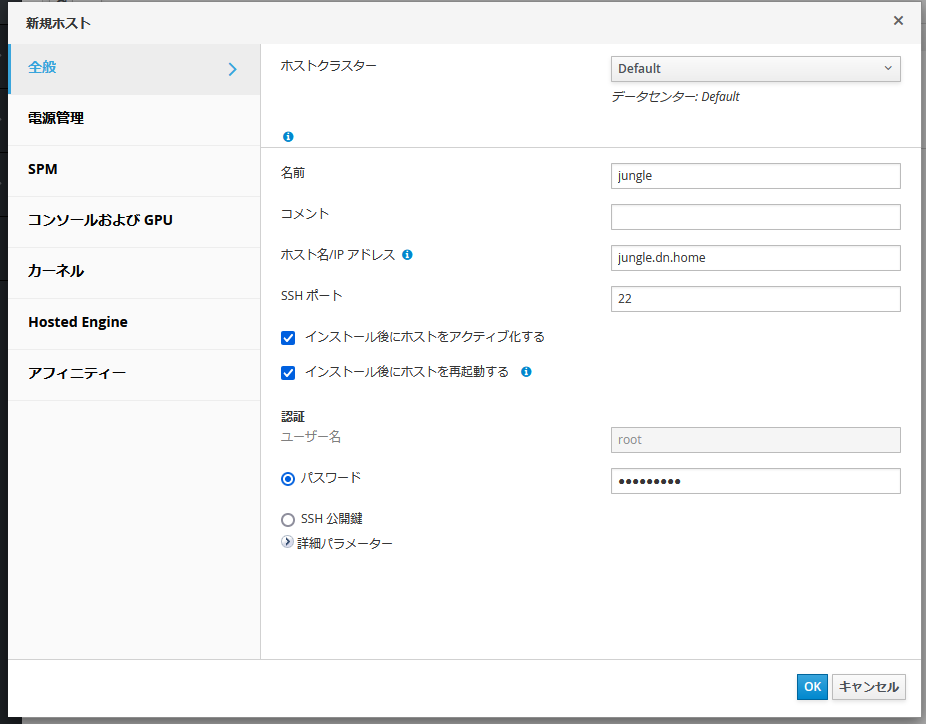
電源管理設定のメッセージが出るが、とりあえず「OK」で続行。
KVMホストが一覧に追加され、インストール作業が始まる。

しばらくすると、自動的にKVMホストが再起動される。

再起動後もしばらく時間がかかるので待っていると、最終的にステータスがUpになる。

これで、KVMホストの追加は完了。
KVMホスト上にローカル記憶域を準備
仮想マシンのインストールに使用するISOファイルや、仮想ディスクの置き場所としてKVMホスト上にローカル記憶域を作成する。
# mkdir -p /data/images
# chown 36:36 /data /data/images
# chmod 0755 /data /data/images
管理ポータルの「コンピュート」→「ホスト」で対象のホストを選び、「管理」→ 「メンテナンス」を選択。
同じく「管理」→ 「ローカルストレージを設定」を選択。
先に作成したディレクトリのパスを設定する。
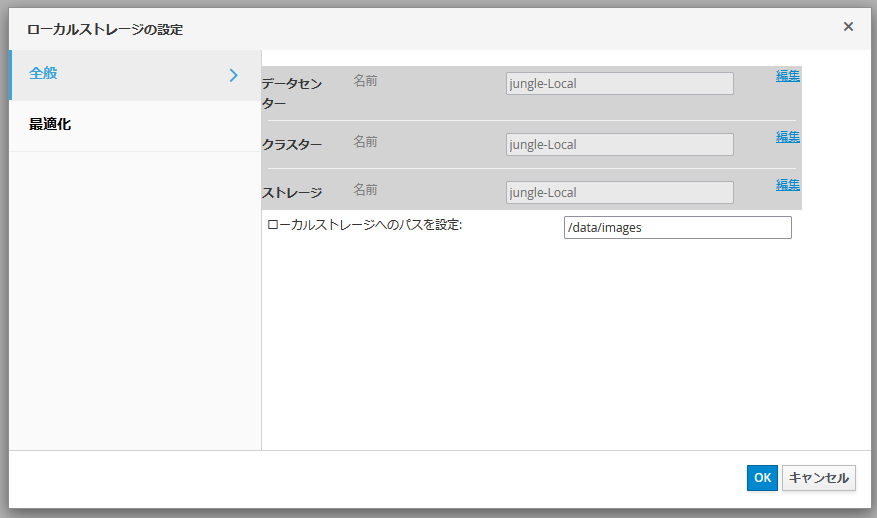
データセンターやクラスター、ストレージといった設定もローカルストレージに合わせて自動的に設定されるようだ。
ISOイメージのアップロード
「ストレージ」→「ディスク」→「アップロード」→ 「開始」を押下。
「ファイルを選択」でローカルのISOファイルを選択して、アップロード先のデータセンターなどが先ほど構成したローカルストレージになっていることを確認、「OK」を押下。
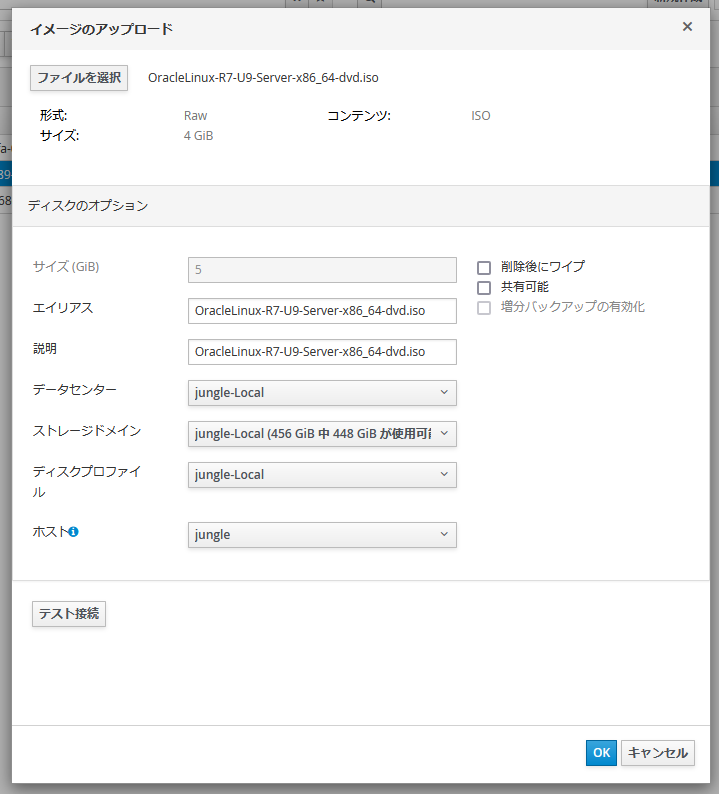
ちなみに、ブラウザがFirefoxの場合、ここで「テスト接続」を押すと以下のようなエラーになった。

ブラウザにCAの証明書がインポートされていないというエラー。CAの証明書はメッセージ上のリンクからダウンロードできるのでインポートを試みるのだが、すでにインポートされていると出てしまう。
Microsoft Edgeであればこのようなメッセージは出ず、CAの証明書を別途インポートする必要もなかった。原因はよくわからない。
アップロード完了すれば以下のように表示される。

仮想マシンの作成
「コンピュート」→「仮想マシン」→「新規作成」ボタンを押下。
仮想ディスクを個別に作成しないといけない。ストレージドメインなどは先に作成したローカルストレージを選択すればよい。
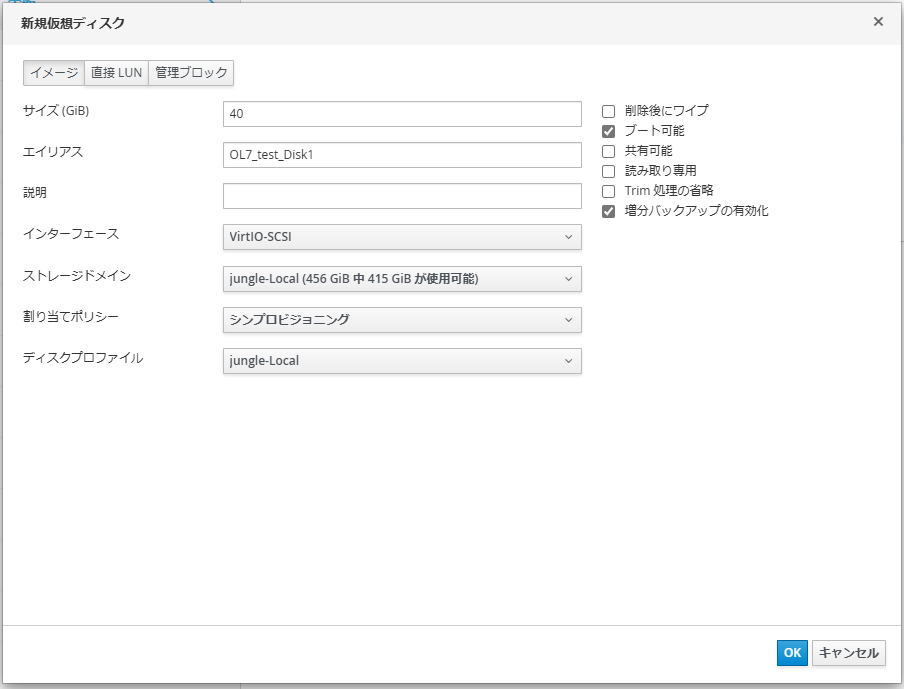
そのほか、「詳細オプションを表示」でメモリ割り当てなども適宜設定して作成する。
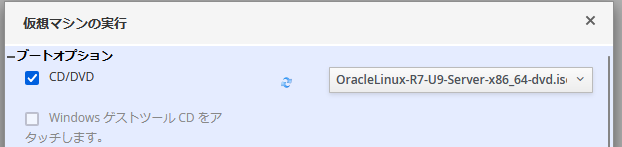
初回起動時はISOファイルから起動させる必要があるが、「実行」ボタンの「1回実行」を選択すると起動オプションの変更ができる。

ここで、CD/DVDを選択できるので、配置済みのISOファイルを選択して起動する。
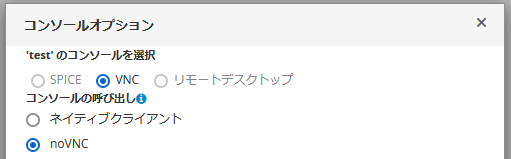
仮想マシンのコンソール画面をブラウザ上に表示する場合は、「コンソール」→ 「コンソールオプション」で「noVNC」を選べばよい。
とりあえず、ここまでで仮想マシンの作成はできるようになる。
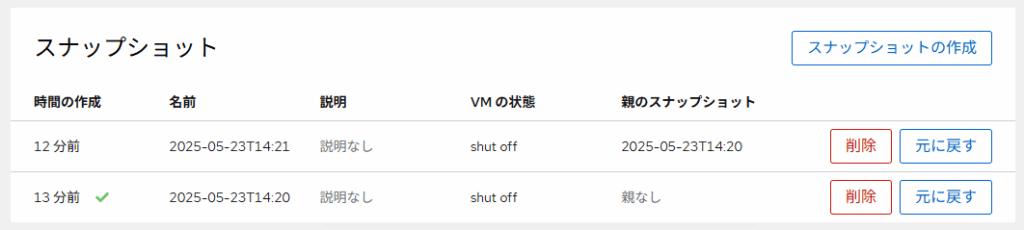
スナップショットの取得
CockpitではできなかったKVMのスナップショット取得も問題なくできる。
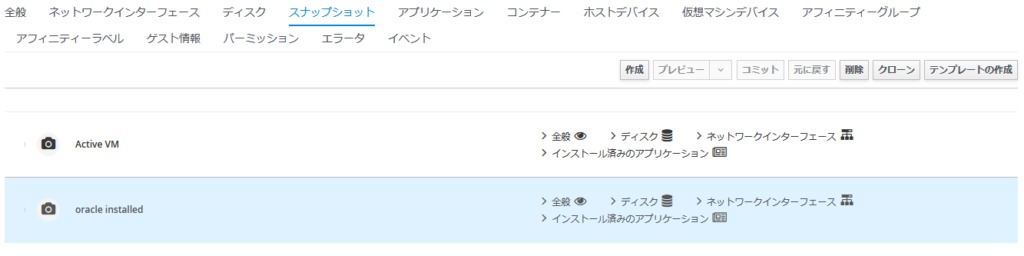
ESXiと比較すると、スナップショットの取得やそこからの復元に結構時間がかかる印象。
また、スナップショットを戻すのが「プレビュー」という操作になるのだが、どうもそれは一時的な状態と想定されているようで、完全にそのスナップショットに戻す場合はさらに「コミット」を行い、取り消すには「元に戻す」操作をする必要がある様子。しかも「コミット」してしまうと、それ以降にとられたスナップショットがすべて消えてしまうなど、ちょっと癖がある。あるスナップショットから複数の状態に分岐させるようなことができないように見えるので、この辺りはESXiのほうが使い勝手は良さそう。
簡単に触ってみただけだが、個人用途で適当に仮想マシンを立ち上げる分には十分使えそうな雰囲気。まぁ、ESXiにある既存の仮想マシンをどうやって移植するのかとかいろいろ課題はあるので、本格的に使うのはまだずっと先だろう。
それにしても、BroadcomとOracle。どちらもあまりいい印象のある企業ではないけれど、最近のBroadcomは公正取引委員会が立ち入り検査に乗り出すなど露骨に悪徳企業のイメージが強くなっていてなんだかなと思う。あるいは行政処分でも下れば、無償版のESXiが復活するようなこともあるのだろうか。


コメント