今まで、日常的な作業管理(対応履歴管理)のために自作のWebアプリケーションを使っていた。
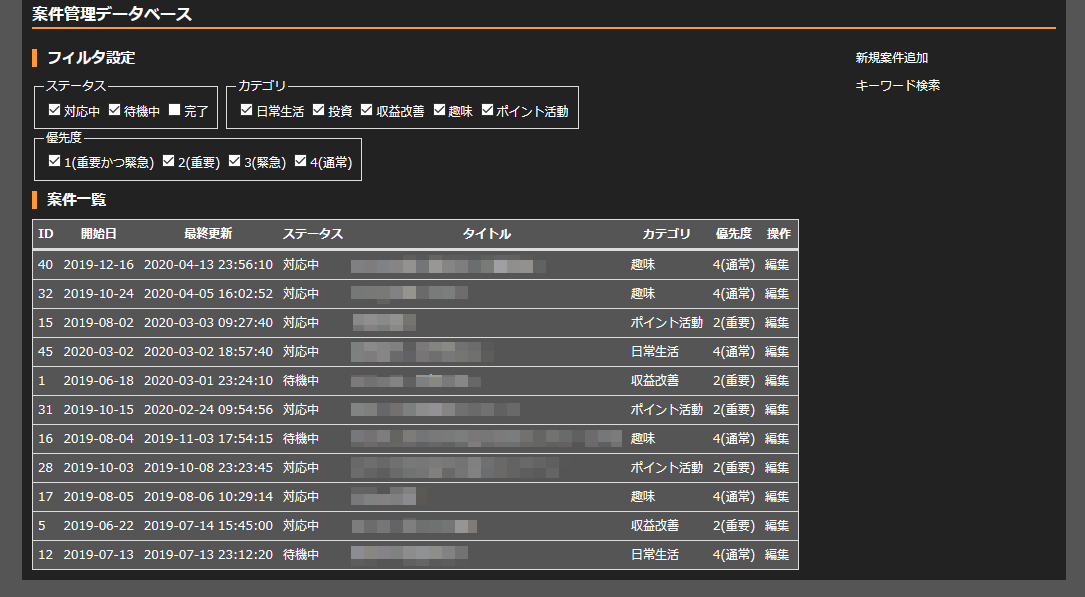
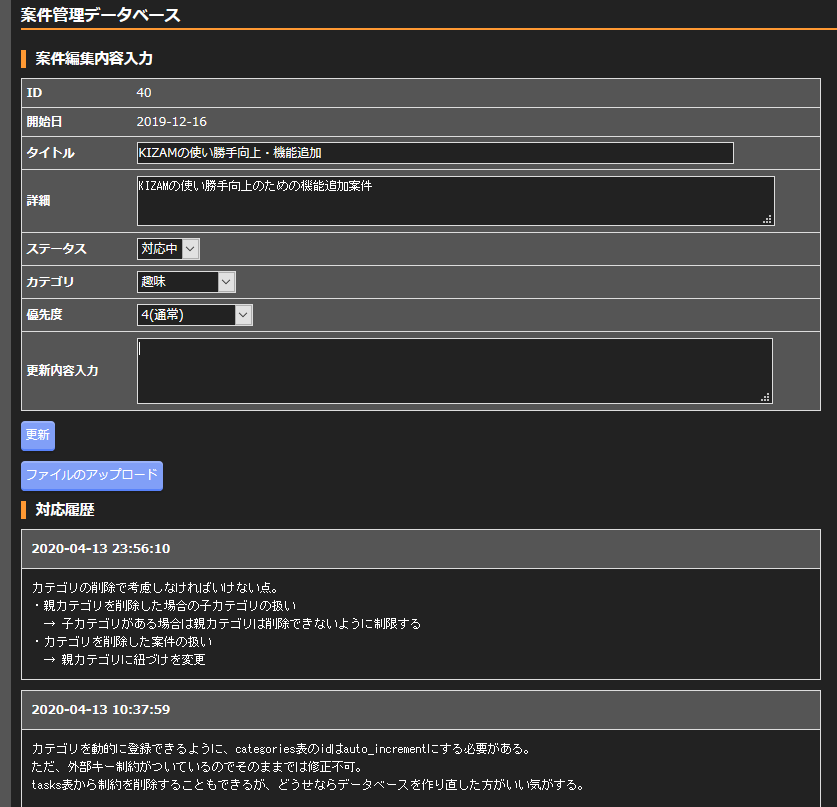
こんなやつ。昔仕事で使っていたRedmineを参考に、暇つぶしを兼ねて数日で作ったもので、機能的には最低限。
最近もっとまじめに作業管理をしたいと考えるようになったのだが、自作アプリの改造に時間をかけるくらいなら、素直にRedmineを使ったほうがいいと思い、久しぶりに使ってみることにした。
必要なもの
今回はRedmineを動かすサーバを自前で構築する。要点は以下の三つ。
- Rubyが動作するOS
- データベース(MySQL・PostgreSQL・SQLiteのいずれか)
- Webサーバ
このあたりがセットで導入できるBitNamiとやらもあるらしいが、個人的にその手のツールはあまり使いたくないのでそれぞれ別個に用意する。
OSにはLinuxを使うことにした。ディストリビューションにはCentOS8を選択。Ruby等の必要なツールがリポジトリから比較的容易にインストール可能なのが、選んだ理由。
データベースは、単に慣れているからという理由でMySQL。Redmine 4.1は公式ではMySQL 5.7までしか対応していないと書かれているが、CentOS8の標準リポジトリ上にはMySQL 8.0しか存在しない。
[root@redmine ~]# dnf module list mysql
CentOS-8 - AppStream                                                                    6.1 kB/s | 4.3 kB     00:00
CentOS-8 - Base                                                                          16 kB/s | 3.8 kB     00:00
CentOS-8 - Extras                                                                       5.4 kB/s | 1.5 kB     00:00
CentOS-8 - Extras                                                                        19 kB/s | 5.5 kB     00:00
CentOS-8 - AppStream
Name                    Stream                       Profiles                             Summary
mysql                   8.0 [d][e]                   client, server [d]                   MySQL Module

ヒント: [d]efault, [e]nabled, [x]disabled, [i]nstalled
Oracleの公式リポジトリも、RHEL8向けには5.7が用意されていないようで、仕方なく8.0を使うことにした。
最後に、必須ではないかもしれないがWebサーバ(Apache)も別途準備する。Redmineに同梱されている(というより、Railsについてくる?)WEBrickとやらでも動かせるらしいが、せっかくなので。
構築手順
OSのインストール
今回は、インストール時の「ソフトウェアの選択」で、「最小限のインストール」+「開発ツール」を選んだ。
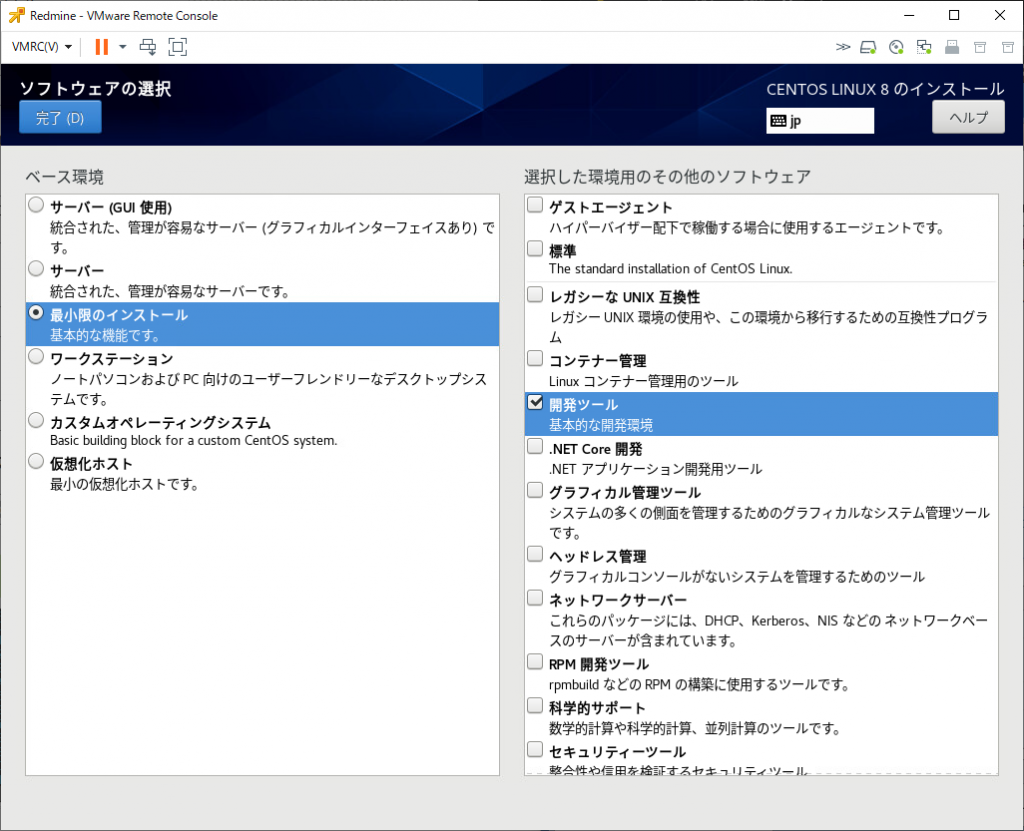
開発ツールに関しては、後から以下のコマンドで導入することもできる。
dnf groupinstall "Development Tools"それ以外のネットワーク設定などは適宜実施。
OSの設定
SELinuxの無効化
/etc/selinux/config の該当箇所を以下のように修正。OSを再起動する。
SELINUX=disabledファイアウォールの設定
HTTP通信を許可するため、以下を実行。
# firewall-cmd --add-service=http --permanent
# firewall-cmd --reload
必要なパッケージのインストール
全てCentOS8の標準リポジトリから導入可能。
# dnf -y install mysql-server mysql-devel httpd httpd-devel ruby ruby-devel libcurl-develMySQLの設定
MySQLを自動起動するよう設定し、デーモンを起動。
# systemctl enable mysqld
# systemctl restart mysqld
続いて、初期設定を行う。
# mysql_secure_installationVALIDATE PASSWORD COMPONENTについて聞かれたら、今回はセットアップしないので、”n” と答える。
rootユーザのパスワードを設定し、匿名ユーザの削除、リモートのrootログインの無効化、テストデータベースの削除等について聞かれたら、全て “y” で進める。
Securing the MySQL server deployment.

Connecting to MySQL using a blank password.

VALIDATE PASSWORD COMPONENT can be used to test passwords
and improve security. It checks the strength of password
and allows the users to set only those passwords which are
secure enough. Would you like to setup VALIDATE PASSWORD component?

Press y|Y for Yes, any other key for No: n
Please set the password for root here.

New password:

Re-enter new password:
By default, a MySQL installation has an anonymous user,
allowing anyone to log into MySQL without having to have
a user account created for them. This is intended only for
testing, and to make the installation go a bit smoother.
You should remove them before moving into a production
environment.

Remove anonymous users? (Press y|Y for Yes, any other key for No) : y
Success.


Normally, root should only be allowed to connect from
'localhost'. This ensures that someone cannot guess at
the root password from the network.

Disallow root login remotely? (Press y|Y for Yes, any other key for No) : y
Success.

By default, MySQL comes with a database named 'test' that
anyone can access. This is also intended only for testing,
and should be removed before moving into a production
environment.


Remove test database and access to it? (Press y|Y for Yes, any other key for No) : y
 - Dropping test database...
Success.

 - Removing privileges on test database...
Success.

Reloading the privilege tables will ensure that all changes
made so far will take effect immediately.

Reload privilege tables now? (Press y|Y for Yes, any other key for No) : y
Success.

All done!
Redmine用データベースとユーザの作成
mysqlコマンドラインクライアントでログインし、データベースとユーザを作成する。
ここでは、ユーザ名・パスワード・データベース名は全て “redmine” としている。
# mysql -u root -p

mysql> CREATE DATABASE redmine CHARACTER SET utf8mb4;
mysql> CREATE USER 'redmine'@'localhost' IDENTIFIED BY 'redmine';
mysql> GRANT ALL PRIVILEGES ON redmine.* TO 'redmine'@'localhost';
Redmineの配置
Redmineのプログラムは以下からダウンロードできる。

redmine-4.1.1.tar.gz をダウンロードしたら、tarで展開して適当なディレクトリに配置する。今回は /redmine に配置することにした。
Redmineのデータベース接続設定ファイルを編集
Redmineを配置したディレクトリの config/database.yml.example をコピーして、config/database.yml を作成。テキストエディタで開き、以下の箇所に利用するMySQLデータベースの情報を入力していく。
データベース名(database: )、ユーザ名(username: )、パスワード(password: )を適宜変更すればよい。
production:
  adapter: mysql2
  database: redmine
  host: localhost
  username: redmine
  password: "redmine"
  # Use "utf8" instead of "utfmb4" for MySQL prior to 5.7.7
  encoding: utf8mb4
Rubyの設定
私はRubyを触ったことがなく、gemやらbundlerやらについて詳しいことは知らないので、以下は全ておまじないである。
次のコマンドを実行することで、Redmineの動作に必要なRubyのパッケージが自動的に導入され、MySQLのデータベースに必要なテーブルを作成したり、デフォルトデータをロードしてくれたりするようだ。
忘れてはいけないのは、実行前にRedmineを配置したディレクトリに移動すること。ここでは、/redmine がそのディレクトリ。
# cd /redmine
# gem install bundler
# bundle install --without development test rmagick
# bundle exec rake generate_secret_token
# RAILS_ENV=production bundle exec rake db:migrate
# RAILS_ENV=production bundle exec rake redmine:load_default_data最後の行で何やら言語の指定を求められるので、ja と入力する。
Webサーバの設定
WebサーバにApacheを使用するための設定を行う。
Passengerのインストール
# gem install passenger
# passenger-install-apache2-module --auto --languages ruby
何やらログが大量に画面上に流れるので、終わるまでしばらく待つ。警告とかいろいろ見えるが、エラーで落ちたりしなければ特に問題はないはず。
プロンプトが返ってきたら、以下を実行する。
# passenger-install-apache2-module --snippetすると、こんな内容が出力されるはずである。
LoadModule passenger_module /usr/local/share/gems/gems/passenger-6.0.4/buildout/apache2/mod_passenger.so
<IfModule mod_passenger.c>
  PassengerRoot /usr/local/share/gems/gems/passenger-6.0.4
  PassengerDefaultRuby /usr/bin/ruby
</IfModule>
これは次の設定で使用するのでどこかにコピーしておく。
Apacheの設定変更
/etc/httpd/conf.d/redmine.conf を作成し、以下を記述する。
/redmine/public はRedmine配置先のpublicディレクトリを指しており、LoadModule以降は、passenger-install-apache2-module --snippet で出力された内容である。
<Directory "/redmine/public">
  Require all granted
</Directory>

LoadModule passenger_module /usr/local/share/gems/gems/passenger-6.0.4/buildout/apache2/mod_passenger.so
<IfModule mod_passenger.c>
  PassengerRoot /usr/local/share/gems/gems/passenger-6.0.4
  PassengerDefaultRuby /usr/bin/ruby
</IfModule>
次に、/etc/httpd/conf/httpd.conf を開き、以下のようにDocumentRootをRedmineの配置先ディレクトリに変更する。
DocumentRoot "/redmine/public"続いて、Redmineの配置先ディレクトリの所有者を変更(Apacheの実行ユーザ)するために以下を実行する。
# chown -R apache:apache /redmine最後に、Apacheの自動起動の有効化とデーモンの起動を行う。
# systemctl enable httpd
# systemctl start httpd
ログインしてみる
これで、ブラウザに対象のサーバのアドレスを入力すれば、ログイン画面が表示されるはずである。
ユーザ名とパスワードは両方ともadminに設定されているので、ログインできればひとまず作業は完了。

コメント